My previous adventures learning about blacksmithing have touched off a bit of fascination with the process of making knives. But, as satisfying as I found the process of making the small paring knife with Karl, it didn’t seem like something that’d be possible to continue without a large amount of space and a good deal of large (if not expensive) equipment. Instead, in the weeks after my time with Karl, I found myself hunting down social media feeds of other knifemakers whose work I found interesting.
There was of course Town Cutler and Bernal Cutlery to follow, both of whom frequently mention makers who sell through them. There was also WKRMN, an artist in northern Minnesota who’s managed to craft for himself a fiercely loyal following and an extremely active (and seemingly successful) system of auctioning off his creations exclusively through Instagram. But the voice that I’ve found most inspiring so far belongs to Dietrich Podmajersky, whose semi-eponymous Podforge creations struck a chord with me.
Dietrich’s work struck me as immediately beautiful in its subtlety and quiet delicateness. It reminded me of Martin’s work, if Martin were to make knives. After sifting through his feed, I thought I’d drop Dietrich a line to say hi and tell him how much I liked his work.
He responded politely, and we struck up a brief conversation wherein I explained that I’d dipped a toe into knifemaking but wasn’t really sure how to continue. I asked if he might be able to offer any recommendations for someone just starting out. He offered several books, and I’m still working my way through them all, but one has been particularly eye-opening.
The overarching theme of Wayne Goddard’s $50 Knife Shop is that there are plenty of ways for people like me, who lack both space and equipment, to nevertheless craft knives for themselves. Goddard’s book is more or less a summary of his own shop tools, which consist largely of home-built contraptions he uses to forge and craft knives. It becomes clear in the book that being a packrat ranks high on Goddard’s list of enjoyable hobbies; most of his equipment descriptions start with “I picked this up for a few dollars at a flea market/yard sale/junkyard/etc,” and while that’s all well and good, I’m not sure I want my hobby to be sifting through junkyards for tools, nor do I have storage space for a collection of maybe-useful-someday junk.
But the thing that I found so inspiring was Goddard’s resourcefulness, and so I started thinking about ways I could improvise a knife shop in the space I have available to me; namely, my very cramped 1-car garage (which is occupied most of the time by a car).
A “bladesmith,” I’ve learned, begins his/her work at the forge; steel is heated and persuaded into shape with heavy hammer blows before the final blade shape is found at the grinding wheel. There’s no real way around the need for a forge to do this, and managing one demands a reasonable amount of space and adequate ventilation. It’s not really a smart thing to do in one’s garage.
But there are other knifemakers who lack the resources or interest in tackling this, and begin instead with the latter half of the bladesmith’s process. These knifemakers use pre-forged material as a starting point. Tools required for this are more modest.
I decided I wanted to try this latter method.
I found a blacksmith in Alabama who sells high-carbon pattern-welded knife material. His “damascus” is sold fresh from his forge; steel in this raw, untrimmed form is called a billet. Knowing very little about what I was doing, I arbitrarily picked a pattern and a billet thickness and placed an order.

I decided my goal was to make as many knives as I could from this single billet, and to try to make as many mistakes as I could to maximize how much I could learn from it.
The first knife I tried was a small kiridashi, a Japanese style of knife typically used for marking work or other small utility tasks around the shop. I was drawn to this as a first project because the small size meant it was likely to be more manageable for me, and also I love the design variation in these little knives. There’s so many interesting designs out there, it was easy to get inspired.
I drew a rough shape onto one end of the billet with a sharpie, then roughly hacked it out with a small hobby saw my dad gave me when I was around 16. It took maybe fifteen minutes or so of sawing, but it worked well enough. To shape the blade, I got out both my handheld angle grinder and my handheld belt sander. I sat crosslegged in the middle of my garage floor, clamping one tool or the other between my feet so that its cutting surface was pointed up, and carefully worked the kiridashi into a shape I liked.
I cannot stress strongly enough that you should never, ever, ever do this. This is pretty much as dangerous as it possibly gets, and I knew as much. But as soon I was done I knew there were some mistakes I was cool with not making.
Anyway, after sanding/grinding, I was left with a shape I kinda liked.

I still had some heat treating to sort out in order to actually sharpen the blade, but the whole reason I bought this billet was because I wanted to play with damascus etching, and I was impatient to try it out.
The brilliant pattern in the billet (as it was shipped to me) was the result of acid etching; the billet is made of multiple types of steel, each with its own alloy makeup. These steels degrade at different rates. Freshly-ground, the steel looks shiny and uniform, but given time and wear, the steels begin to break down at different rates and a beautiful lacy pattern appears. We can artificially help this along by soaking the blade in acid. For my kiridashi, I mixed up a cup of white vinegar and citric acid, for no other reason than I had both handy in my kitchen.

In about the amount of time it took me to drink a delicious beer, small bubbles had begun forming on the sides of my kiridashi. When the knife had a nice level of contrast, I pulled it from the acid with some tweezers and dropped it in another nearby glass of water and baking soda. There was a small fizzing as the acid was neutralized, then I rinsed the blade with soap and running water…to discover that all the nice dark ‘stuff’ easily washed away.
Hm, I thought. I figured maybe I just hadn’t let the knife soak in acid for long enough; surely when this is done ‘for realsies’ by proper knifemakers, acids much stronger than vinegar are probably used. Maybe I just needed to give it more time.
I plopped the knife back in the water and drank another beer. When I’d finished, I again transferred the knife to my baking soda solution, then rinsed it…and again, the blackness rinsed away.
Judgement in no way dulled by this point, I wondered what might happen if I warm the vinegar. Sarah has a small crock pot used to heat cleaning solution for jewelry making, so I transferred my acid solution to it, turned it on, dropped the knife in and went to watch TV for several hours. When I returned to check on it later in the evening, I discovered that this trick indeed had worked…really, really well.

Maybe a little too well. The steel was fizzing and frothing violently when I thought to check it, and when I removed it, neutralized it and rinsed it I found there to be almost no visual contrast between the steel layers, but a very, very obvious topological contrast. The aggressive etching also made clear the large gouges left by the 60-grit sandpaper I’d used to shape the knife. It sort of looked like wood, which is maybe partly interesting, but it didn’t feel very nice to hold at all.
I took to doing a bit of research about this etching process. I learned that there are two things going on: acids indeed eat away at each steel’s molecules at different rates, but oxygen in the acid solution also reacts with carbon in the steel to oxidize the layers at different rates. It’s this oxidation that gives rise to high-contrast visual patterns. So, etching pattern-welded steel involves some decision-making into exactly how one wants to represent the lamination patterns. To boost the oxidation rate of the steel, I could try artificially-boosting the oxygen content of my etching bath by adding some hydrogen peroxide.
Ok, lesson learned. I sanded the deep etch off the kiridashi, then worked my way through finer and finer grits until I had the blade close to a mirror finish. I added slight bevels to the edge and drilled a small hole in the end of it, then worked on heat-treating the blade.
As I learned with Karl, heat-treating is a process by which steel is rendered hard and tough, so that it may be sharpened. Knifemakers can and do get very precise about this heating process, but blades have been around a lot longer than most modern heating equipment, so for this blade I wanted to try something simple.
The first step in heat-treating a blade is raising it to what’s called Austentizing Temperature. At this point the iron and carbon atoms in the blade have sufficiently loosened up as to become very active and unorganized. If left to cool slowly, these atoms reorganize themselves tidily and the steel is rendered annealed, or soft. My damascus billet arrived in this annealed state, which is why I was able to saw/grind it rather easily.
But, if the blade is cooled suddenly, the carbon and iron atoms don’t have time to arrange themselves tidily, and instead are locked into a very high-tension, disorganized state. It’s this state that allows the steel to be sharpened.
The first matter, then, was heating my kiridashi up to Austentizing temperature. Expert knifemakers do this in a dark space, so that they can watch the color of the steel as it heats. When it gets to a dull cherry red hue, the steel can be quenched quickly in oil, water, or brine, rendering it hardened. But there’s a lot of subtlety and subjectivity to gauging hot steel colors, and I lack the eye for it currently.
Thankfully, it just so happens that a few degrees below the Austentization temperature for a given steel lies the Curie Point, above which the steel is no longer magnetic. So, an imprecise but nevertheless effective way to tell whether a blade has been sufficiently heated is to touch it periodically with a magnet as the steel is being heated. When the magnet fails to stick, the blade can be quenched and hardened.
To do this in my garage, I sat two propane torches upright and angled the nozzles towards each other to form a sort of cross-flame-chevron sort of shape. Using some blacksmith’s tongs, I held my kiridashi betwixt the flames as I periodically touched it with a telescoping magnet used to pick up screws and such. When the magnet failed to tug at the blade, I lowered it into a bread loaf pan filled with leftover peanut oil I had in my kitchen. After a quick hiss and a few moments of cooling, I dried the blade off and tried scraping it with a file. It felt and sounded like glass…successfully hardened.
In this state, the blade was too brittle to be terribly useful; I could sharpen it but if I ever stressed or dropped it, it was more likely to snap or shatter than to bend. I needed to temper it. To do this, I preheated my kitchen over to 400F and hung the blade from one of the oven racks with a paper clip for an hour, then let it slowly cool to room temperature.
I re-etched the blade using my vinegar/citric solution, but some reading online warned me against rubbing the steel immediately after neutralizing it. Instead, many makers advised warming/boiling the blade in my baking soda solution, to “set the oxides”. I’m still not sure what that means or how it works, but it does seem to be effective; after rinsing the blade and gently drying it, the visual contrast was maintained much better. I waxed the blade and sharpened it on my stone, and my first homemade knife was complete.
For my second blade, I wanted to learn a bit more about making handles. The knife I made with Karl was a partial-tang knife, which meant the steel under the knife blade was shaped into a stubby ‘tail’ that was expoxied into the handle. I wanted to try making a “full-tang knife”, in which the steel runs through the length of the handle. Full-tang knives are arguably stronger, and making the handle for one is very different from that of a partial-tang knife.

Still wanting to conserve my billet material, I came up with a design that offered a full-size handle but a stunted blade. I again worked more or less intuitively to land on this design; I drew some curves I liked, and used a cut-off wheel on my Dremel to roughly cut it out (I tried hand-sawing it for a hot minute, but realized it would take me hours for this notably-larger knife).
Not wanting to repeat the same dangerous shaping methods I used for the first knife, I bought a small portable workbench to work on. I flipped my handheld belt sander upside-down and clamped it into place, which is only slightly safer than clamping it between my feet. I again roughed it into shape, this time needing to also try to uniformly grind the master bevels into the knife. This latter part was pretty difficult to do by eye, and I was only marginally-successful at it. After shaping, I drilled some holes through the knife tang using my hand-held drill, then used the same heat-treating procedure to harden this blade.

After heat treatment, I ground some interesting bevels to the tip of the blade, then used the same technique to etch it as before.
There are dozens of different materials from which one can make knife handles, and this was the bit I wanted to explore for this blade. One interesting material is brand-named Micarta, a material made by laminating layers of fabric or paper to yield something tough, wear-resistant, and waterproof…perfect for knife handles. Searching around for information about this material unearthed heaps of youTube videos describing instructions for making ‘homemade Micarta’ from fiberglass epoxy and things like jean denim or canvas.
In rambling about this stuff to Sarah at one point, she suggested “You should try making some out of suit fabric.” I thought this was a totally awesome idea, so I gathered together a handful of scraps Sarah bought me from a local fabric store, cut them into strips, and laminated them together between two blocks of plywood that I’d wrapped with plastic wrap. The fumes from the fiberglass epoxy were terrible, but the next morning I had several blocks of handle material to work with.

I cut one of the blocks in half, then clamped the halves to my knife handle and drilled holes for steel pins that would hold these handles (called “scales”) in place. Maintaining proper alignment of all the holes was a bit tough with a handheld drill, but I ultimately was able to epoxy the scales to the tang, then epoxy the pins in place. After the epoxy had dried, I set to work shaping the handle. I did this with no prior design work; I just sort of tried to grind it down to something that felt comfortable to hold and didn’t look too dumb. I found this part a bit challenging; the grinding caused the handle to heat up, so I had to take frequent breaks to let it cool down enough to touch.

I ended up with something that felt uniquely comfortable; there are small divots where my thumb and forefinger naturally fall when I grasp the handle, which were kind of fun to work out. The handle has a slight texture to it; I can feel the layers, which I think might mean that the resin didn’t fully soak into the fabric (I think this makes sense, since it’s wool?).

Once I’d sanded the handle down to about 800 grit, I decided I wanted to try buffing it to a polish using a small benchtop grinder my parents bought me a couple months ago for my birthday. I took the blade to the polishing wheel first, thinking that buffing it might shine up the ‘high’ spots of the blade…but it almost completely obliterated all of the dark oxides as well. Not exactly what I was after, but I still thought it looked ok, and another lesson learned.


For my third blade, I got the idea to try making a small “X-acto”-style blade for Sarah. I chopped off a thin sliver from the edge of my billet, then again freehand-traced some swoopy curves that I liked onto the steel. Instead of grinding out this shape entirely on my belt sander, I mostly used my benchtop grinder.
The heat treating and etching for this blade went similarly to the previous blades; I again wanted to play with adding scales, so I used wood from a small, dyed stabilized burl that I bought online. “Stabilized” wood has been impregnated with resin, rendering it waterproof and immune to warping from humidity. After clamping and epoxying on the scales, I again sanded them down with my belt sander.


I ran into the same heat buildup here that I did on the previous knife, and again just resolved to muscle through it. But the thinness of the blade meant that heat built up in it much more quickly, and after a time I noticed one of the scales peeling away from the steel: the epoxy was failing. I immediately stopped when I realized what was going on. The knife wasn’t ruined, but I could see how it could be if I continued. I decided to repair the small unpeeled section with a dab of super glue, and managed to finish it out without destroying it further, but I was happy to understand the limits of the epoxy, as well as the purpose of the pins in the handle (which helped hold the scale in place despite the epoxy failure).
For my fourth knife, I was feeling confident enough to want to try making something with a bit more utility to it, something functional and useful. After eyeballing the remainder of my billet and sketching a few shapes, I decided I might try making something like a chef’s knife. I say “something like” because a chef’s knife is often 8 or more inches long, and the space I had to work with on my billet limited me to a blade length of about 7 inches; I could make something slightly smaller than a proper chef’s knife, but larger than a petty knife.
I began the blade as before, sketching out a shape onto the billet and grinding away until I had a profile I liked. While visually I had liked the aggressive curves of my previous two knives, I found them to be slightly less than ideal from an ergonomic perspective; the forward lean of both make them a little awkward to actually use. I realized as I was shaping this kitchen knife that I needed to care about things like knuckle clearance if I wanted to use the knife to chop, and to pay mind to the shape of the belly of the knife so that it glided smoothly along its length when I mimicked dicing motions. I kept coming into my kitchen from my garage, testing the knife’s feel out on my cutting board and marking the edge with sharpie to take note of where I needed to smooth things out.
I learned about ergonomics the hard way with the 2nd knife I made above. The area of knife where the front edge ends near the handle (so, not the point, but the ‘heel’ part of the blade) is called the “choil”. The choil of my suit fabric knife leans towards the blade, and has a diameter that makes it very inviting for a thumb to be placed there. But because it leans into the blade itself, it’s easy for the thumb to slip up onto the edge, where it can easily get cut. A friend to whom I was showing that knife did exactly this, slicing her thumb open to a not-insignificant depth. This made me feel about as great as you might expect, and I resolved not to ever overlook the ergonomics aspect of such a dangerous tool again.
Once I had the profile shaped, I needed to add the master bevels to the blade. I suppose I could have tried to do this by eye again, but since my blade was now significantly longer, I knew it’d be even harder to keep things straight and true. After some consideration, I decided to do two things: I invested in a small 1″-wide benchtop belt sander from Harbor Freight, and I built myself a jig to hold the blade at a consistent angle as I ground it. By measuring and adjusting the small ‘table’ on the belt sander, I could get a bevel that was more or less flat (way flatter than I could get working by eye at this point).

I needed to drill holes in the blade for the scales, and I also decided I wanted to make bolsters for this knife (I’ll talk about these more in a minute). I don’t have space for a drill press, but I knew I needed to be able to drill perpendicular holes to ensure everything would line up better than it did on my previous knives. I hoped to find some sort of rack that I could mount my handheld drill in to convert it into a press, but the few racks I found seemed cheap and flimsy for what they cost and the amount of space they consumed. Finally, however, I found something called a “drill guide”:

The idea with this thing is that I was meant to clamp it to my workpiece, and by virtue of it being thick and made of hardened steel, it would keep a drill bit running perpendicular to a given surface. This thing worked like a charm, and I was able to bore the holes I needed for scale and bolster pins.
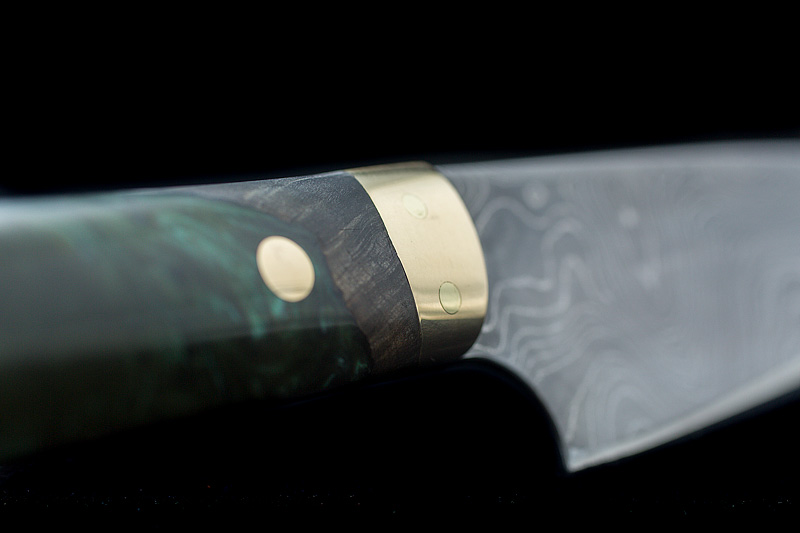
Back to the bolsters. Bolsters are bits of metal attached between the handle scales and the blade itself. They’re meant to add strength (“bolster”) to the knife. I decided to make some out of brass. I bought a bar of Naval brass (a brass alloy that resists corrosion) and cut two bits off to serve as my bolsters, then shaped them into something that I thought looked nice. The sides of the bolsters that are adjacent to the blade need to be fully finished, because it’s way more difficult to do this after the bolsters are attached.

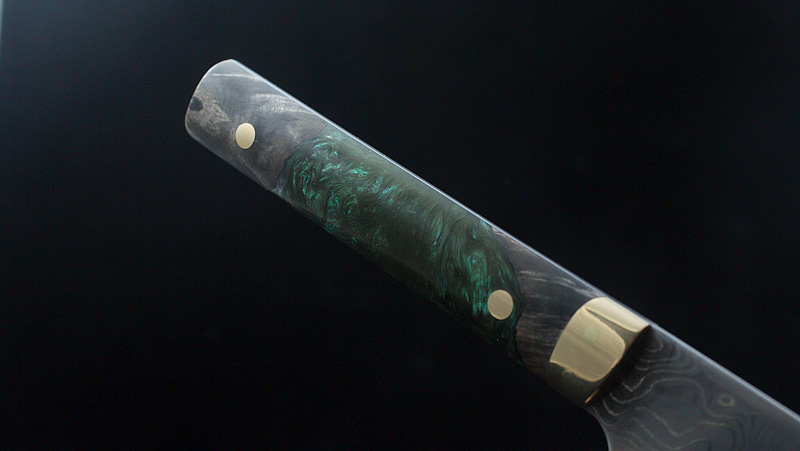
For the handle material, I wanted to try something unique, and also wanted to involve Sarah a little. She’s a big fan of green, so I found a small block of stabilized burl wood with some large voids in it that had been filled with resin. The resin had metallic mica flake stirred into it before it was injected into the burl; when the resin hardened, the flow patterns are made visible by the mica flakes, and the whole thing takes on a deep, iridescent sheen.


After shaping the bolsters and cutting down the burl block, it was time to heat treat the blade. I could have tried to do this with my ghetto propane torch setup, but the risk for uneven heating was very high because of the size of the blade, so I decided to try something else. My friend Erik has also been exploring knifemaking, and has a temperature-controlled kiln for this exact purpose. So I gathered up by materials and headed over to his house one afternoon to play.
Before visiting Erik, I called the blacksmith who made my billet to ask if he had any more precise instructions for treating my steel than the magnet test. “Sure thing,” he replied in a thick southern accent. “Take it up to ’bout 1550F, then let it soak anywhere from two to ten minutes. You can oil quench it after that, I use peanut oil.”
Erik’s kiln is built for sophisticated heat treatments that involve holds and soaks at various temperatures and times, and allow him to custom-program curves that specify these temperatures within very tight tolerances. These complex time/temperature curves are essential for heat-treating complex stainless steel alloys, but thankfully my carbon steel damascus requires way simpler treatment. For this blade, we placed my blade in the oven and turned it on, allowing it to rise to 1550F before we set a timer to let the blade soak at that temperature for 10 minutes. In retrospect, this was probably a generous soak that might not have accomplished much more than a soak at 2 minutes, but whatever. Learning.

After ten minutes had passed, I removed the blade and quenched it in a nearby brownie pan filled with peanut oil.
As the blade heats, carbon in the steel reacts with oxygen in the environment to form CO2, which ‘decarburizes’ an outer layer of the steel, leaving behind brittle pure iron. This process is called “scaling”, and can involve significant material loss if the soak time is very long. In my case, I’d ground my blade a bit thicker than I needed in anticipation of this material loss, which flaked off quickly as it cooled.

I brought the blade back home, and after two tempering cycles at 350 in my oven it was hardened and ready for final shaping. For previous blades, I’d been content for my heat treat to be ‘good enough’, but after the more-precise treatment at Erik’s, I was curious how hard this blade had actually gotten. I bought a set of hardness testing files, which range themselves in hardness from 45 Rockwell C up to 65 Rockwell C. The idea with these is that you start at the lowest file, and try scraping your blade with each file until one of them ‘bites’ the steel. Hardness of the blade lies somewhere between the ‘biting’ file and the one before it. My knife blade ended up somewhere between 55 and 60 Rockwell, though the 60 file only barely bit, so my estimation is somewhere around 58-59 on the scale. From what I’ve read online, this is about right for a western carbon steel mix.
Of course, this test is a bit inaccurate when it comes to pattern-welded steel like what I’m working with here. The steels that make up this billet each reach a different hardness after heat treating. Some makers argue that this lends to overall blade toughness: some steel gets very hard and brittle, while other steel remains more ductile and flexible. The argument is that you get the best qualities of all the steels used, though there’s not a ton of hard evidence to support or deny this.

After tempering, I ground the blade down to its final thickness, and flattened the tang on a slab of granite to which I’d taped some sandpaper. Then I moved on to etching the blade, using the same technique as before. I attached a small iron wire through one of the holes in the tang to make it easier to transfer the blade from warm vinegar to warm baking soda solution.
The blacksmith who sold me the billet had mentioned that the way he ‘set the oxides’ was by gently wiping his blade in mineral oil after etching, then hanging it in his shop overnight for the oil to soak into the metal. I felt a little odd about using mineral oil, so I dipped my blade in olive oil, then suspended it over a tray to let it dry overnight.

Now, at this point I was feeling pretty precious about the beautiful high-contrast oxides I had on my blade. I learned with my kiridashi and my “x-acto” knife that Renaissance Wax did a great job of ‘locking’ the oxides into place and preserving the pattern, but the wax isn’t foodsafe. The billet itself arrived with a very high-contrast pattern etched into it, but closer inspection showed paint strokes on the steel, indicating that it had been varnished immediately after etching. I needed a way to try to protect the blade during the scale-attaching phase, and it had to be foodsafe.
I had an idea to melt some beeswax I had in my pantry with some walnut oil, and smear the paste onto the blade to allow it to harden. My thought was that I could wrap this in paper towels, then again in painter’s tape, and this would gently protect the blade while I worked with it. That was my theory, at least…and it was based on absolutely nothing other than a guess.

The next step was to do the final fitting of the scales and the bolsters to the tang. I flattened the tang-facing sides of the scales on my granite slab+sandpaper, then cut some strips of sandpaper to hold between the scales and the bolster to sand the scales down until they exactly touched the bolster surface.

When I was satisfied that the bolsters and scales were fitting well, it was time to permanently attach the bolsters. I epoxied both of these in place, then inserted brass pins through the bolsters and tang, and ‘peened’ (rounded over) the protruding tips of the pins. The peening process causes the internal material of the pins to swell, pressing into the bolsters to ensure a tight mechanical fit should the epoxy fail.

After the bolsters were attached, I drilled holes for the main scale pins, then epoxied the scales into place.

To help minimize visibility of gaps between the pins, bolsters, scales and tang, I mixed up batches of epoxy with sawdust from the scales and metal dust from the bolsters, then tried to fill the gaps accordingly.

When the epoxy had dried, it was finally time to do the final handle shaping. Using a combination of my small belt sander and lots of hand sanding (and being cautious not to overheat the handle), I worked it into a round shape with a slight taper towards the blade.

The shaping process involved grinding the bolster pins flush with the bolsters themselves; normally this should render the bolster pins almost invisible. Unfortunately, it looks like I used two different types of brass, so the pins are visible.
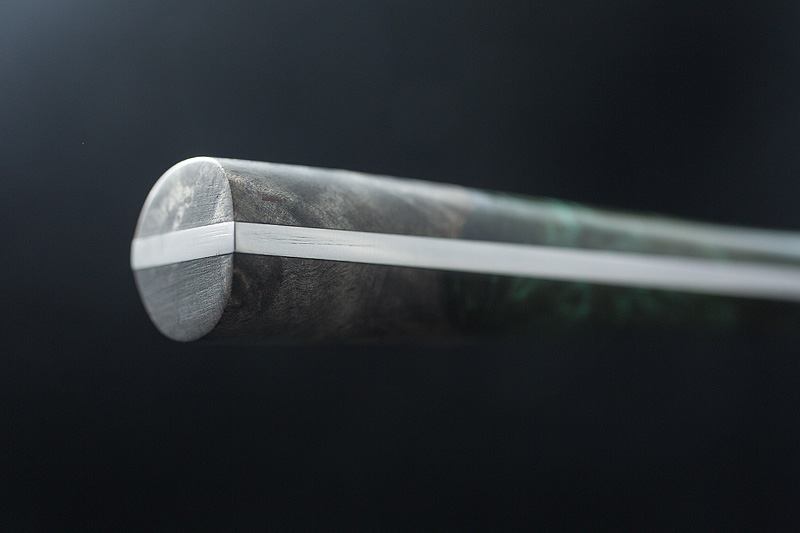
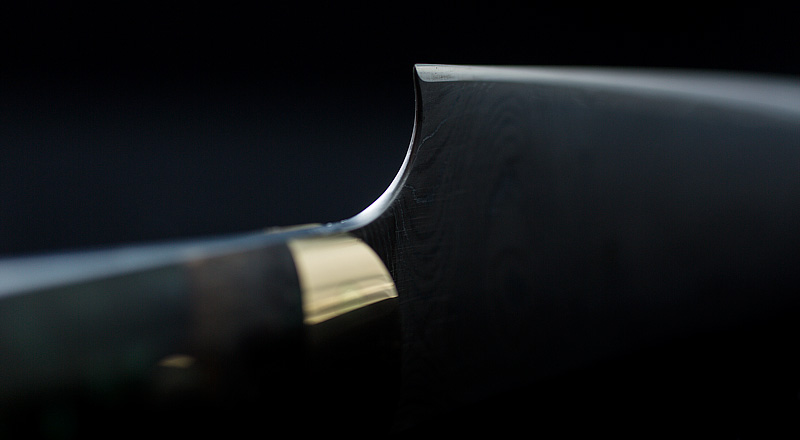
I worked the steel through sanding grits up to 2500 before doing a final buffing to a satin finish on my grinding wheel. I also gently rounded the spine of the blade, to make it more comfortable when using it for long amounts of time, or when sharpening it.
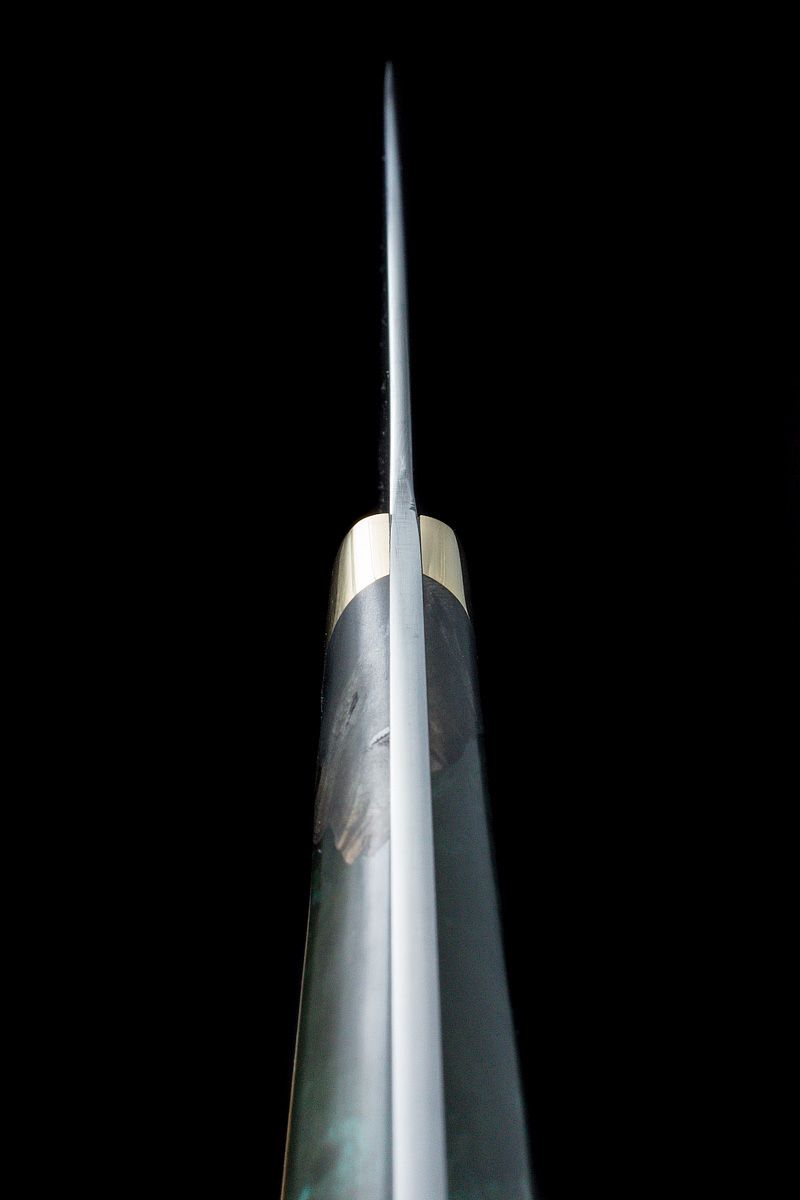
The choil at the heel of the blade was also rounded over, and comfortably catches any fingers that might roam forward on the handle towards the blade.
The beeswax-coating trick sort of worked; when I removed the tape and buffed away the paste, I lost some of the black oxides, but I’m still happy with the finish. And if I ever want to punch it back up a bit, I can always dip the blade in vinegar, cut some limes, or smear some yellow mustard on the blade to re-etch it gently.

The final step was sharpening the blade to a razor edge…then using it to make dinner.


